My first carbon steel pan! Unlike coated pans, carbon steel pan requires seasoning before first use. We need to put a layer of cooked oil on the pan so be becomes nonstick.
I’ve been searching for a versatile pan for a while. I want a pan that is healthy, can withstand high heat, put a nice flavor on protein, oven safe, relatively lightweight, nonstick, durable, and does not empty my wallet. Oh yea, I want it all! I’ve tried various pans made of different material and now I’m going to give carbon steel pan a try.
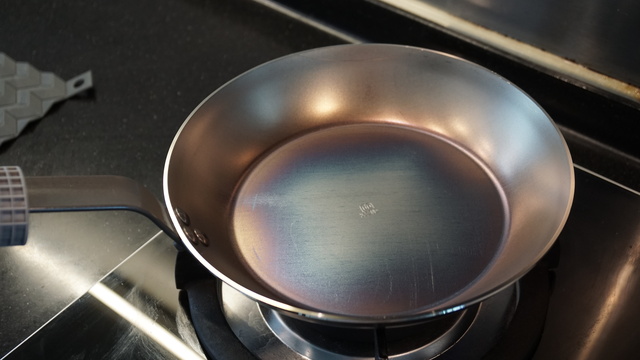
I got a 26cm mineral B debuyer. It is probably one of the safest choice when it comes to carbon steel. This pan is 1.9kg, 0.6kg lighter than my cast iron. My very first impression is that it does not feel much lighter than my cast icon. It’s got a rustic appearance. The pan surface is smooth and perfectly flat.


Cleaning the factory coated beeswax
Now let’s get it cleaned up. First thing to do is to wash it with hot water and removed the beeswax. I use boiling water and scrub it with a sponge (the soft side). Clean the top and bottom side. The beeswax is invisible. Just give it 2-3 minutes of gentle scrubbing on both sides. Then I change the water and repeat the process for a second time. I can smell the beeswax during the process, and it smells quite nice.

Season the pan
Next, dry the pan with paper towel. Heat it up on medium-high heat. I prefer gas heating. IH stove heats up metal in contact and it takes longer to heat up the wall.

I’m using a method found on youtube, that is different from the manufacturer’s instruction. There are so many tutorials online and I think this method prevents burn mark as much as possible.
Heat up the pan for about 10-15 minutes. Rotate the pan as it heats up. That prevents burn mark on the bottom. Tile the pan around so the side gets the heat too. Observe the color change. It starts by browning, then turn to purple-blue, and finally silvery-white.

When it gets to silvery, it is ready. The pan is now piping hot, be careful with that! Noticed the side doesn’t get as hot and there is a color graduation. I find it aesthetically pleasing.

Now turn off the heat and let the pan cool down for around 4 minutes. Around 180C, below the smoking point of vegetable oil.
Update: It may be better to cool it down further before next steps. When the pan is this hot and when oil is added to the pan, it creates an oil mark.

Take some pictures of you new pan. Because after the next step and normal cooking, the pan will not look as nice :)
Next, pour in vegetable oil until it fills up the inner surface. Swirl the pan around so the oil covers a bit of the side. Then use a paper towel and oil the pan completely. Pour excess oil into a container. Turn the pan up side down and oil the bottom. Make sure there is a thin layer of oil spread evenly. Pay attention to the inner rim, there are usually more oil there than other area. If you leave too much oil, they will form a thick layer and they peel off more easily.

Next, it is time to burn the oil. The carbonisation will be your non-stick layer.
Heat up the pan on medium. Heat it until the oil starts to smoke. Let it burn for 2 minutes and then turn off the heat. I noticed the some burn mark on the bottom. That is probably because some of the oil are burned away when heated directly by fire. Use the oiled paper towel and wipe the bottom. Make sure the entire surface is covered.
Next, try to let the pan cool down slowly. Let it cool down under the hood until it stops smoking. Then I put it inside an oven. No need to turn it on, I just want the pan to cool down slowly.
A couple hours later, the pan is cool down. I take the pan out and wash it with hot water. Dry it and then heat it up on my stove. Apply a thin layer of oil on both side and heat up the pan until the oil starts to smoke. Turn off the heat, wipe it with a paper towel to ensure an even spread, and then I let it cool down once again in a cool oven.
I think two layers is fine – I hope I am not wrong. The pan should be ready for cooking. Wipe it with paper towel and when excess oil are removed, the pan should not feel sticky. I’m going to cook something tomorrow and see how it performs.
First sear
I love steak so it’s gotta be a steak. Look at the color, the heating property of debuyer is just excellent. Nice browning on the outside. I cook the sirloin on medium heat, 1 minute on each side. Then reduced to low heat and started bracing with garlic and rosemary. Let it rest for a while and serve with Thai jaew. Next time I should cook it for less time. After resting, I’ll put the steak back to the pan so it’s nice and hot on the plate. Beef fat is so much tastier when it’s hot.

Cleaning after use
For cleaning, I use the same steps as my cast icon. I wait for the pan to cool then add water. Heat up the pan until the water boils. Then I use a brush to remove any sticky bits and scraps. Repeat the process a few times then dry the pan with paper towel. This is how it look right now. I’m hoping the patina will improve over time.

Maintenance
After a few cooking with this pan, it will darken. Some of the protective oil will be removed as you scrap the pan or cook acidic ingredients. When you feel some part of the surface is exposed, it is time to add seasoning to the pan. Heat the pan up until it smokes, then let it cool down to around 170C. Apply a thin and even layer of oil. Then heat up the pan. When it starts to smoke, let it burn for 2 minutes. Turn off the heat and let the pan cool down slowly.
Aesthetically it may not look very nice. Some area will be darker than others. But the non-stick property is second to none. Eggs, crepes, or fish – they just slide around with proper amount of oil and temperature. Every time I cook with this pan, I cannot help smiling!
![]()